TL;DR
A closet vocal booth works best when you focus on placement and sealing over relying solely on foam. Proper absorption and ventilation are key to reducing reflections, leaks, and heat buildup—making your recordings clearer and quieter.
Ever wondered why some closet setups sound surprisingly good, while others turn into echo chambers? The secret isn’t just foam or fancy panels — it’s where you put your mic, how you treat reflections, and how well you seal leaks. Most beginners focus on absorption, but real success comes from combining placement, sealing, and ventilation.
If you want your closet to become a true vocal booth, you need to think beyond just stuffing blankets. This guide will show you how to use space, materials, and clever tricks to get the clearest, quietest recordings possible — without breaking the bank.
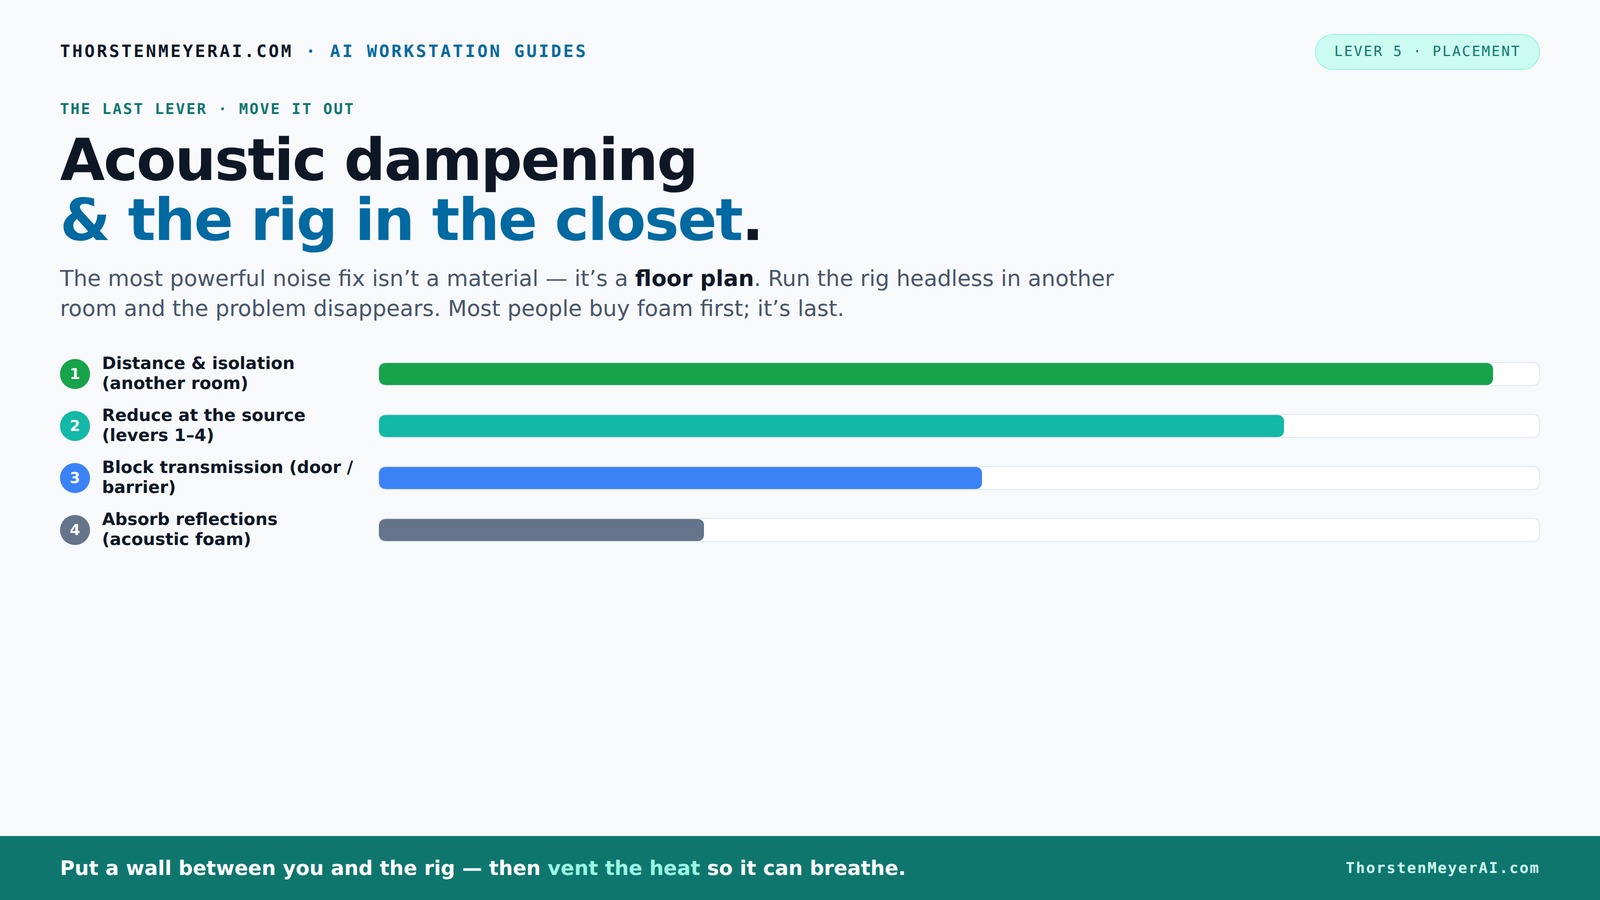
Acoustic dampening
& the rig in the closet.
The most powerful noise fix isn’t a material — it’s a floor plan. A rig you can’t hear because it’s in another room beats any amount of foam. Tap the approaches in Part 1 to see what actually works.
(another room)
(levers 1–4)
(door / barrier)
(acoustic foam)
Contain the noise, not the heat
Key Takeaways
- Moving your rig into a different room is the most effective way to eliminate noise, especially with network control.
- Proper ventilation is crucial in sealed closet setups to prevent heat buildup and maintain performance.
- Sealing gaps around doors, cracks, and vents greatly reduces sound leaks, often more than adding foam or panels.
- Placement of the mic and treatment points can make or break your sound quality; treat reflection zones first.
- Combine absorption with sealing and ventilation for a quiet, cool, and professional-sounding closet booth.

Focusound 52 Pack Acoustic Foam Panels 1" x 12" x 12" Sound Proof Foam Panles Soundproofing Noise Cancelling Wedge Panels for Home Office Recoding Studio with 300PCS Double-Side Adhesive
Soundproofing - Acoustic foam panels triangular grooves structure for better noise absorption, helps to reduce and absorb unwanted...
As an affiliate, we earn on qualifying purchases.
As an affiliate, we earn on qualifying purchases.
Why Distance & Isolation Are Your First Moves
Moving your rig away from your workspace or into a different room is the easiest way to cut noise. Think of it like placing a speaker far from your ears — the farther the sound source, the less you hear. For a lot of voice work, your computer or AI rig can be tucked into a closet or basement, leaving your desk silent.
Imagine you’re in a small office, working on a project, and your noisy GPU rig is in the next room. You can still control it over the network — no need to listen to the roar all day. This simple step drops noise levels dramatically, often more than any foam treatment could achieve.
So, for an effective setup, just put the rig in a closet, connect it via wired Ethernet, and forget about noise — unless heat becomes an issue, which brings us to ventilating your closet.

Portable Recording Booth for Home Studio, Foldable Sound Isolation Vocal Shield with Floor Stand, High-Density Acoustic Blanket Enclosure for Singing, Voiceover & Podcast, Includes Phone Holder
INSTANT STUDIO-QUALITY "DRY" SOUND: Transform any noisy room into a professional vocal booth instantly. Engineered with high-density acoustic...
As an affiliate, we earn on qualifying purchases.
As an affiliate, we earn on qualifying purchases.
The "Rig in the Closet" Strategy — Great for Noise, But Watch the Heat
Placing a hot, high-load rig inside a closet can make it whisper-quiet — but only if you give it a way to breathe. Sealing a closet completely traps heat, causing temperatures to soar. A GPU working 24/7 can push the ambient temperature up by 10-15°C unless you vent it properly.
To make a closet work, you need a simple ventilation plan: a passive vent or, better, a quiet exhaust fan. These keep the hot air flowing out and cool air coming in, preventing overheating. Some builders use ducted exhaust systems that combine with soundproof materials, creating a space that’s both quiet and cool.
Check out this guide for detailed cooling setups. Remember, a sealed, unventilated closet is a recipe for thermal throttling and noisy fans — defeating your entire goal.

Professional Studio Recording Microphone Isolation Shield, Pop Filter,High density absorbent foam is used to filter vocal. Suitable for Blue Yeti and other condenser microphones (AO-504 With Stand)
♪【The package contains】♪: Microphone Isolation Shield x 1, Metal Thread Adapter x 2 (Adapt most microphones), Adjustable Stand...
As an affiliate, we earn on qualifying purchases.
As an affiliate, we earn on qualifying purchases.
Acoustic Dampening vs. Soundproofing — What’s the Real Deal?
Acoustic dampening and soundproofing are two different beasts. Dampening reduces echo and reflections inside your closet, making vocals clearer. Soundproofing, on the other hand, blocks sound from escaping or entering. For a closet, most improvements come from combining both, but they serve different goals.
Imagine a tiny room lined with foam. It might sound less echoey, but if your door is just a crack, noise still leaks out. To truly block sound, you need to seal gaps, add mass to the door, and create a barrier — not just absorb inside.
Research shows that in small spaces, the biggest gains come from sealing leaks and adding mass, rather than relying solely on foam. Check out this comparison table to see how different treatments stack up.
Understanding this distinction helps you prioritize your efforts: dampening improves clarity within your space, while soundproofing ensures external noise doesn't bleed in or out, which is crucial if your environment is noisy or if you want maximum privacy.

SD SODOCT 24 Pack Self-Adhesive 12" X 12" X 1.2" Egg Crate Soundproof Wall Panels for Studio, Room Acoustic Treatment Foam, Sound Absorbing Foam Black
[Acoustic Treatment Leader] SD SODOCT self-adhesive acoustic panels offer a new solution for indoor acoustics. The solution combines...
As an affiliate, we earn on qualifying purchases.
As an affiliate, we earn on qualifying purchases.
How to Position Your Mic for Clear, Reflective-Free Recordings
Where you put the mic in your closet makes a huge difference. The goal is to avoid capturing reflections and standing waves that cause mud and boxiness. Place the mic so your voice projects into the most absorbent part of the space — usually toward treated walls or away from the door.
For example, if your closet has a wall with hanging blankets behind the mic, it will absorb many reflections. Avoid placing the mic exactly in the middle of a small, parallel-walled space, which can cause resonant peaks. Instead, position it closer to one wall and angle it slightly.
Pro tip: Use a mic stand with a shock mount and keep the mic about 6-12 inches from your mouth. This balances proximity effect and room sound. Experiment with placement to find the sweet spot — a little off-center often works best.
Deeply understanding mic placement is vital because small changes can significantly impact the clarity and warmth of your recordings. Proper positioning minimizes the room’s influence, reducing muddiness and ensuring your voice is captured cleanly. The tradeoff is that moving the mic too close can introduce proximity effects, so find a balance that suits your voice and space.
Where to Put Absorbing Materials for Maximum Effect
The best way to dampen reflections in a closet is to treat the main reflection points first. That means the wall behind the mic and the wall you face when speaking. Use dense, soft materials like acoustic panels, moving blankets, or thick rugs.
For example, hanging a layered blanket about 4-6 inches behind your mic can significantly reduce echo. Cover the side walls and ceiling if space allows — especially if you notice flutter echoes or hollow sounds.
In very small booths, bass buildup can cause boominess. Adding bass traps in corners helps tame these low frequencies. Remember, coverage matters more than just foam — aim for about 20-30% wall coverage for a noticeable difference. The implication is that targeted placement of absorption materials maximizes their effectiveness, reducing the need for excessive coverage that can clutter the space or block airflow.
Best Materials for DIY Closet Sound Treatment
In a closet, you want materials that are thick, soft, and layered. Think moving blankets, thick foam, acoustic panels, and rugs. These are easy to find and cheap enough to layer for better absorption.
For instance, hanging a few blankets with an air gap behind them can dramatically cut reflections. Combine foam panels on the wall behind the mic with bass traps in the corners for a balanced setup.
Remember: foam alone isn’t enough. Dense, layered coverage beats cheap foam every time. The tradeoff is that layering multiple materials can reduce airflow and make the space feel cramped if not planned carefully. For more tips, visit Keller Kunst for art and space optimization ideas.mizing absorption without sacrificing ventilation or comfort. Check out [this article](https://thorstenmeyerai.com/low-noise-pc-cases-airflow/) for ideas on mounting and materials.
How to Stop Sound Leaks Through Gaps and Doors
Gaps around the door are the biggest leaks in most closet setups. Sealing cracks with weatherstripping or acoustic sealant is a must. For the door itself, adding a blanket or a mass-loaded vinyl panel can block sound better.
Imagine closing a door and noticing a faint whistle or muffled sound escaping. Seal that gap with weatherstripping or a draft stopper. For added mass, hang a heavy blanket or install a soundproof door seal kit.
This simple step can cut noise leaks by 50% or more, making your recordings much cleaner and your neighbors happier. Remember, the more airtight your space, the less external noise will intrude, but be mindful of ventilation needs to prevent heat buildup.
When Do You Need Bass Traps in a Tiny Closet?
Bass traps are essential when your recordings sound boomy or hollow, especially in very small booths. They absorb low frequencies that tend to build up in corners and cause muddiness.
For example, if your voice sounds muffled or your recordings have a “hollow” quality, adding bass traps in the corners can help. But in tiny spaces, sometimes wall coverage and surface treatment matter more than focusing only on corners.
Some creators find that a thick blanket or foam layer on the ceiling and walls reduces low-frequency issues just as well as expensive traps. The tradeoff is that bass traps, when used strategically, can significantly improve clarity by preventing low-frequency buildup that causes muddiness and boominess, especially in confined spaces.
Latest Trends: DIY, Placement, and Combining Absorption & Sealing
Recent DIY closet booth builds focus on practical, low-cost solutions. Layering blankets, hanging rugs, and strategic placement of panels beat expensive professional treatments in tiny spaces. The emphasis is on smart mic positioning and sealing leaks.
Creative makers now stress that absorption and isolation are different goals — absorb reflections, and seal leaks for soundproofing. Combining these techniques yields the best results without breaking the bank.
For a thorough approach, visit [this guide](https://thorstenmeyerai.com/reduce-heat-noise-ai-workstation/) for cooling and setup tips, and check recent creator videos for real-world examples.
Frequently Asked Questions
Is a closet good enough for vocals or voice-over work?
Yes, a closet can significantly reduce room reflections and echo, making it ideal for vocals and voice-overs. However, it won't automatically block outside noise unless you seal gaps and add mass. For best results, combine treatment with sealing and ventilation.
Do I need acoustic foam or panels?
While foam can help reduce reflections, coverage and placement matter more. Layering blankets, rugs, and panels often give better results in small spaces. Foam alone isn’t enough—use it as part of a layered approach.
Where should I put the mic in a closet booth?
Place the mic toward the most absorbent wall, usually away from the door and reflective surfaces. Avoid placing it in the center of a small, parallel-walled space to prevent standing waves. Experiment for the best sound.
How much treatment do I need?
In small closets, covering about 20–30% of walls with absorptive material often reduces echo effectively. More coverage can improve clarity, especially if reflections are prominent or the room sounds hollow.
Can blankets replace panels?
Yes, thick layered blankets work well for DIY booths, especially when hung with an air gap. They’re a cost-effective way to absorb reflections and reduce echo without buying dedicated panels.
Conclusion
Remember: the best closet booth isn’t just about layers of foam. It’s about smart placement, sealing leaks, and managing heat. When you combine these elements, your recordings will sound clearer, quieter, and more professional—no matter how small the space.
Start with where your rig lives, then treat the reflection points, seal gaps, and ventilate. Your closet can become a surprisingly effective studio, without the noise or heat chaos.